
This is the little sweetie last night. This is how the dresser looked when it arrived at my place. 
Not quite as fancy, and in rough shape. 
There were a lot of spots that needed wood filler. I had to keep coming back and adding more because every time I would come back to it, I would find more cracks and dents. 
We spent one Saturday priming a bunch of pieces. After it was sprayed, it already started looking much nicer. I then painted most of the dresser in Bher Marquee pure white.
I used my Silhouette Cameo vinyl and paper cutter to design and cut out the Coca Cola logo. I have had several vinyl machines and this one by far is my favorite btw. 
I applied the logo and I kept pressing the edges down. The vinyl doesn't love to stick to wood as much as it does smoother surfaces. I took white spray paint and gave it a light spray to try and avoid paint bleeding under. 
Then I brushed the red over the top of the vinyl stickers. 
After peeling it off you can see, it still bled through a bit. It is to be expected. That's where a small brush and a touch of paint comes in. 
After that was fixed, I painted the trim gray. You can see in this picture that gray paint is very dull and unexciting. I want it to look more like silver or chrome so I used gilders paste in silver to achieve the look. 
Here it is with the paste on it, very shiny! You can see just below the shine is the regular painted part. I just use my finger and rub it in by hand. 
The bottle cap knobs we ordered only came in brass but you can see with a touch of the gilders paste, now they look chrome as well. 
Here they are all shiny and sweet! 
Here is a little more of what the side looks like when you change it up with the paste. I love this stuff! If you get any on a painted area that you didn't want it on, you can simply take some clear paste wax and rub it over the spot and it takes it right off. 
I ordered from Amazon this bottle opener and bottle cap collector for the side. It's fun and functional. Because the wood is old and brittle, I didn't want people to rip a hole through the dresser side trying to open a bottle. 
I used a scrap board to screw the opener and catcher into on the inside of the dresser. No one will ever see it but it makes it much stronger and I feel much more confident about people using the cap opener. 
Of course I had to test it! Home Depot started selling Mexican coke, with all the yummy full sugar goodness. It's my special treat drink lately. (about one a week) The opener itself is not the best, it took me and my 9 year old quite a few tries to get it to work. I am sure it will be mostly decorative but in a desperate situation it does work. 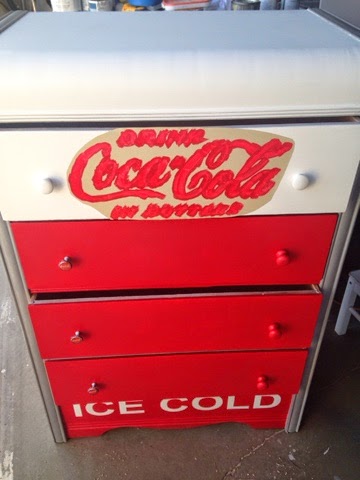

For the front logo, I used my vinyl as a stencil and I painted it after the fact. Both ways work, both ways bleed a bit. I haven't found a fail proof way to make it perfect but that's what touch-up brushes are for. Here are some of the side by side before and after shots.
I still have one side logo to go and a few more knobs to put on. The ones that are just red will also be bottle caps soon. 
I am going to go over the faux chrome and make sure it's not missing spots as well before we spray it with a clear protection coat.
This dresser is making me thirsty!
Have a great day, Love Lori.
It's so much fun to see you step by step process. Sure makes me feel like a novice next to your expertise. But I'm so grateful for your talent and all the hard work you put into it. I just love it!
ReplyDeleteThis dresser makeover is awesome!! Love it!!
ReplyDeleteI just love this! You're so talented! I think I might have to get a Silhouette machine now. Thanks for the inspiration and thanks for sharing!
ReplyDeleteThanks so much for sharing! A definite "must do"!!!
ReplyDelete