Saturday, April 11, 2015

Daydreaming in design

I spend much of my life daydreaming, I always have.  In school I would have my German teacher yelling at me in her Finnish-German mix because I would be staring out the window and being lost in thought. I have always loved art and design and I still find myself daydreaming for long periods of time.  Today my daydreams are about NYC loft apartments.  
The classicly gorgeous and ridiculously expensive places I can only glimpse on TV.  This one with the clocks was on an episode of Selling NY.  I think its price tag is ten billion and a half, or something just as outrageous and out of reach to kids like me.  
The closest I have is this cool clock I paid about $120 for online and I had to bolt the pieces together.  I love this clock!  Someday I plan to make a faux brick wall to mount it on.
What I love about NY apartments is things like exposed brick, industrial lighting and clean lines and colors. 
Add wood floors and artwork and it feels very swanky to me. I like it very much! 
My inlaws have a brick wall in their basement,  they had it installed with some built in glass that looks like old pub windows. It feels like you are walking into an old pub like Cheers.  It takes a boring old wall at the bottom of the stairs and it makes you feel like you're walking into a secret underground city.  It's fun!  I wish I had a photo on my phone.....  Next time. 
We are just renting right now but someday we will buy another home.  I have a lot of time to daydream on how I would like to decorate.  Today it's NYC loft and industrial style,  tomorrow it might be Victorian Steampunk.
  (That was my husband's guess when I made him guess the style I would like to do) 

Show me your style,  I would love to hear about it!  

Love, Lori

Friday, April 10, 2015

Coke Dresser

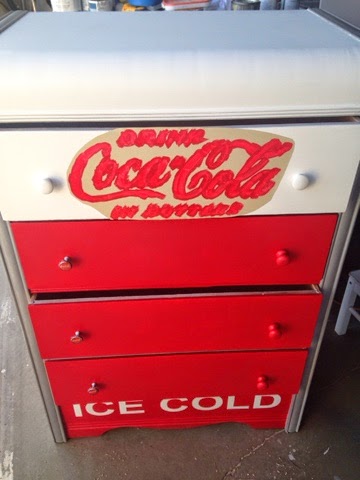
Since the Coke dresser is almost complete,  I will break down some of the steps I did to get it here. 
This is the little sweetie last night.  This is how the dresser looked when it arrived at my place. 
Not quite as fancy,  and in rough shape.  
There were a lot of spots that needed wood filler.  I had to keep coming back and adding more because every time I would come back to it,  I would find more cracks and dents. 
We spent one Saturday priming a bunch of pieces.  After it was sprayed, it already started looking much nicer.  I then painted most of the dresser in Bher Marquee pure white.
I used my Silhouette Cameo vinyl and paper cutter to design and cut out the Coca Cola logo.  I have had several vinyl machines and this one by far is my favorite btw. 
I applied the logo and I kept pressing the edges down.  The vinyl doesn't love to stick to wood as much as it does smoother surfaces.  I took white spray paint and gave it a light spray to try and avoid paint bleeding under. 
Then I brushed the red over the top of the vinyl stickers. 
After peeling it off you can see, it still bled through a bit.  It is to be expected.  That's where a small brush and a touch of paint comes in.  
After that was fixed, I painted the trim gray.  You can see in this picture that gray paint is very dull and unexciting.  I want it to look more like silver or chrome so I used gilders paste in silver to achieve the look. 
Here it is with the paste on it, very shiny! You can see just below the shine is the regular painted part.  I just use my finger and rub it in by hand. 
The bottle cap knobs we ordered only came in brass but you can see with a touch of the gilders paste, now they look chrome as well. 
Here they are all shiny and sweet!  
Here is a little more of what the side looks like when you change it up with the paste.  I love this stuff!  If you get any on a painted area that you didn't want it on, you can simply take some clear paste wax and rub it over the spot and it takes it right off. 
I ordered from Amazon this bottle opener and bottle cap collector for the side.  It's fun and functional.  Because the wood is old and brittle,  I didn't want people to rip a hole through the dresser side trying to open a bottle.  
I used a scrap board to screw the opener and catcher into on the inside of the dresser.  No one will ever see it but it makes it much stronger and I feel much more confident about people using the cap opener. 
Of course I had to test it!  Home Depot started selling Mexican coke,  with all the yummy full sugar goodness.  It's my special treat drink lately. (about one a week)  The opener itself is not the best,  it took me and my 9 year old quite a few tries to get it to work.  I am sure it will be mostly decorative but in a desperate situation it does work.  
For the front logo, I used my vinyl as a stencil and I painted it after the fact.  Both ways work, both ways bleed a bit.  I haven't found a fail proof way to make it perfect but that's what touch-up brushes are for.  Here are some of the side by side before and after shots. 
I still have one side logo to go and a few more knobs to put on.  The ones that are just red will also be bottle caps soon.
I am going to go over the faux chrome and make sure it's not missing spots as well before we spray it with a clear protection coat.  

This dresser is making me thirsty!
Have a great day,  Love Lori. 
 

Wednesday, April 8, 2015

Jumping from one to another

As most of you know,  I can't sit still.  I can't just do one project at a time either.  There is nothing worse than having time to work, but not doing anything because you are waiting for paint to dry.   Here are the two I am working on right now.  
I have this dresser that is going to look like a vintage soda machine.  It's for my Mother in Law's back covered deck.  When it's all done it will hold her picnic supplies and BBQ tools.  
I am using silver gilders paste to turn the gray paint into more of a chrome shiny look.  Here is what I am doing on these Coke knobs to turn them from brass to silver. 
I have also been finishing up the table and chair set I have been working on. 
Here is the table right now.  Today it will be getting an additional coat of the cherry stain to make it a shade darker and redder.  I think it is looking awesome! 
You can see how rich and dark even the first coat looks from the bare, sanded wood. 
I am hoping that this week I can have the soda machine and the table and chairs all done.  They shared primer and they share a final step as well and that is a nice solid clear coat to protect them.  The soda machine will be outside (but in a very protective spot) and I want it to hold up under wind and dust.  The table and chairs is for a family with kids and kitchen chairs and tables take a lot of friction and spills.  I want the finish to last well for many years!  I will have more of a step by step tutorial for both projects coming up.  
My husband also followed my ottoman tray tutorial and made one for his moms birthday.  Great Job Geoff!  

Have a happy and productive day!
Love, Lori


Sunday, April 5, 2015

Table top time

I have put in a lot of hours the last few days out in the sunshine.  I forgot the sunscreen and now I am officially a red-neck.  ;)
Here is last where we saw This table.  I have been working on surface prep still getting ready for stain.  
I taped off the painted area around the top so when I sand, I don't risk slipping and destroying the clean paint.  See the color on the lip? It all needs to come off and the top needs to be stepped up to being smooth.  
Here are the different grits of sanding disks I am using.  60 to get through the tough varnish down to the bare wood, then going over the table with 80, 120, and finally 220 to get a smooth texture. 
The little lip around the table is especially tricky.  I have to get every speck of poly off the table or it won't properly stain the wood.  The stain we have chosen is a beautiful cherry color.  When staining,  you don't have to get all the previous stain off the table if you are going darker, only if you are going lighter.  It's much like hair dye,  if I went to red or brown it would go quicker on my hair but if a brunette went to blonde,  it takes more work. 
I am just about to stain the top.  I thought I was going to be ready yesterday but as I checked it over and over I still see some stubborn spots on the lip of the table that  are not giving up the poly.  Probably today I can get the first coat on and then another light 220 sanding tomorrow and a second coat.  Then I will go back and check for paint touch ups on all and fix if needed.  After clear coat all the chairs and the table.  
 Here are the chairs now.  All are a uniform and sweet light mint color,  just like the table base.  
If you remember before we had one not uniform in color to the rest.  Now they all look like a perfectly matched set.   Have a great day and I hope to see you soon.  

Love, Lori